Isn’t there a saying somewhere similar to “you can never have enough stuff”? I think that could probably be related to storage as well. And by storage I mean a place to put your digital keepsakes. A digital attic of sorts. It wasn’t too long ago that I ventured into building an upgraded Windows Home Server. I actually never got around to writing about the build process that included 20 hot-swap bays and enough noise to remind you that a server was hanging out in your basement datacenter. That build (now that I look back on it) was finished around July of 2009 – almost 18 months ago and even with 8TB available, I’ve now used most of that up!
Then came along Microsoft’s announcement that Windows Home Server’s Drive Extender was being removed from WHSV2 and seemingly overnight the support for this fantastic OS simply vanished… (Of course, not without a lot of angry supporters sharing their sadness…)
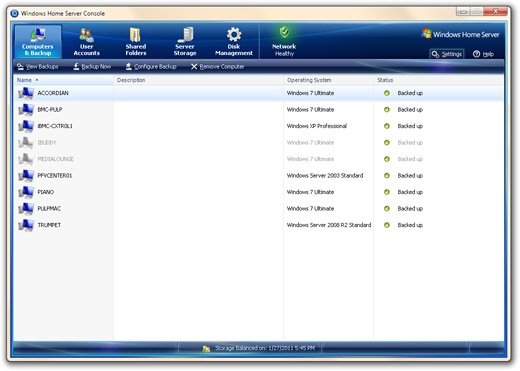
I thought I could overlook some of the misgivings I had based on my own experiences with WHS. While having Drive Extender made having a hodgepodge of drives in my 20-bay case feasible, data redundancy was pretty expensive and a failure of one drive usually wrecked havoc on the overall stability of the system. If one drive started experiencing I/O errors, bad sectors, or controller disconnects, the system would freeze-up and complain non-stop until it was recovered. Knowing that the failure rate of drives in reality were more common than I felt comfortable with, I was always on edge when I needed to perform any sort of OS updates or hardware maintenance. I’ve had more than my fair share of Western Digital’s Caviar Green and Blue drives replaced under warranty. Even moving 1 TB of data around is time consuming and prone to exposing errors.
What to do, what to do. I definitely have the technical know-how to white box out a new server and put some hard drives in it. Previously my main 8TB Windows 2008 R2 file server was just that. 4 2TB hard drives in RAID 0 shared out to the network kept everything running smoothly. That storage system with a performance peak of 220 MB/s was perfectly suited to how I was using it especially since it was fast enough to fill my gigabit Ethernet network as well as local IO-intensive efforts. However, expanding it past 4 hard drives wasn’t easy unless I stayed entirely in the OS for software RAID instead of using the motherboard RAID option.
Did I mention my New Year’s resolution to simplify, simplify, simplify? So it came down to the following requirements:
- Provides an easy way to expand both the disk volumes and the hardware while maintaining all-around performance
- It just has to work. I don’t want to be the engineer, architect, and system support person anymore. I want to be a user…
- Simplify.
- Cost – but I knew for a robust solution I would now have to costs to deal with… But I wasn’t going to pay NetApp prices for a SOHO system…
So what does that get me in reality? Well, I’m always going to be involved in the nuts and bolts, I clearly don’t want to maintain the system. If I continue to stick with a Windows file server, there’s always the patching and maintenance of the system. I also find myself putting other applications on the system… Usually VMware or a secondary media encoding engine. Eventually those start sapping CPU and memory from the primary purpose of simply serving files. (Granted – some of those performance issues are self-inflicted!)
Second option of course is instead of running a Windows-based file server, head on over to the Linux world and build out a white-box NAS OS install. That brings FreeNAS, OpenFiler, or just Linux on it’s own into the picture. Perhaps an all-in-one Groupware system like ClearOS? I’ve dabbled with all of those and found that they worked okay – but not plug-it-in simple. I’m already running VMware ESXi for my OS playground. I don’t want the overhead of maintaining another system for my day-to-day storage efforts.
That left me with choosing the NAS path directly from a vendor. This time a dedicated NAS hardware solution. During each of my previous storage builds, a dedicated NAS was always an option. I usually dismissed that option as too expensive for my expected performance requirements, too slow (if I chose a less expensive components), or simply more fun to build out a white box solution. I soon had servers all over the place that were later consolidated as VMs,but it seemed to be getting a little out of hand. In the end, the overhead of maintaining those servers finally caught up with me with unavailability, hardware flakiness, and solution complication – not to mention noise and nowadays, power consumption.
I will say that no home or small-business technology fan should head out into the unknowns of storage options without spending at least a few hours at the SmallNetBuilder Web site. While for this effort I mostly hung out in their NAS sections, they have sections for networking, security, media, and more. Take your pick of the top rated devices and you probably won’t go wrong. Netgear, Thecus, QNAP, Buffalo, Synology, and the likes of Drobo and others. 18 months ago when I was evaluating hardware NAS devices, Thecus was at the top of my list… After revisiting this path, a new contender happened to come along at just the right time.
Meet the Synology DS1511+.

The DS1511+ and I crossed paths while reading a quick technology update on Engadget’s Web site. The announcement of a NAS device capable of 15TB of storage, RAID5 capable along with (the most important part) up to 197 MB/s read speeds and 165 MB/s write speeds.
Yes, please.
A quick read-through of Synology’s press release and product pages had me practically foaming at the mouth. For the last month since I found out about this upgraded version of Synology’s DS1010+ NAS device, I did nothing but investigate every Web site review, forum review, and online retailer for information. However, it’s relatively new to be sure. Very few retailers had the system in stock. A few devices seemed to be available on eBay, but I didn’t want to go that route. I was hoping that Newegg would be able to take care of me – but alas, they weren’t yet carrying it in stock. (Newegg now has it available…) Based on a some good feedback on Synology’s own user forums, the online vendor Excaliberpc.com actually had some decent prices on the DS1511+ and better yet – a combo deal with an added 5-bay extender DX510. I debated for sure – back and forth. Once I start researching and planning – it’s really not a matter of if, but when. I eventually pulled the trigger.
Delivery, strangely enough, was a drop ship directly from Synology instead of from Excaliberpc.com – arriving right on time January 12th, 2010. To be fair, this isn’t going to be an unboxing review… There are plenty of those around by now – but I was pleasantly surprised by the double-box shipping, the packaging itself, and the simplicity of the setup. According to the specs, each of the small black units are sized at 157mm X 248mm X 233mm (about 6 1/8″ x 9 3/4″ x 9 1/4″) and fit wonderfully side by side or stacked on top of each other (the eSATA cable is long enough to do either.)
Next up was to populate the drive bays. I chose to pick up an additional set of hard disks to fill DS1511+ for a number of reasons.
- If I used the 2TB (x5) drives already in use in my current system, I wouldn’t have a backup in case one of those drives failed during re-purposing.
- Even though I now had 10 bays to populate (5 with the DS1511+ and 5 with the DX510) – I didn’t want to start out limiting my capacity with my existing 1TB drives. Those 1TB drives have were also the Western Digital Green drives and have been spinning non-stop for 18 months. As I’ve mentioned earlier, I’ve replaced my fair share of those drives and have found over time they’re not really the right balance of performance and energy savings I was looking for.
- I wanted to make sure whatever drives I was going to use were on the supported hardware list.
That being said, 5 new HITACHI Deskstar 7K2000 HDS722020ALA330 drives were ordered up from Newegg and in Newegg fashion, they arrived the next day after I ordered them! (And then simply sat in the “datacenter” for 6 days waiting for the DS1511+.)
I actually purchased 5 HITACHI Deskstar HD32000 IDK/7K drives a year ago and they’ve been fantastic. All of those drives have worked out of the box without errors and the performance has been great. Both are supported by the DS1511+ without modification (whereas the Western Digital drives have a lot of write-ups around Load/Unload Cycle Counts and the currently available 2TB Samsung HD204UI is having smartctl issues and isn’t even listed on the Synology supported drives list). While I’m a definitely a fan of finding the lowest $/MB, sometimes it really does make sense to pay a little bit more for a drive.
The setup of the DS1511+ after it was plugged in and attached to the network was relatively painless. While a DVD is included to help with the process, I proceeded to the Synology support Web site and fetched the newest installers. It does seem odd that a Windows or Mac application needs to be installed to find the DS1511+ on your network to upload the firmware/OS. But no matter, really – it works and you’re not required to keep the application around for continued use.
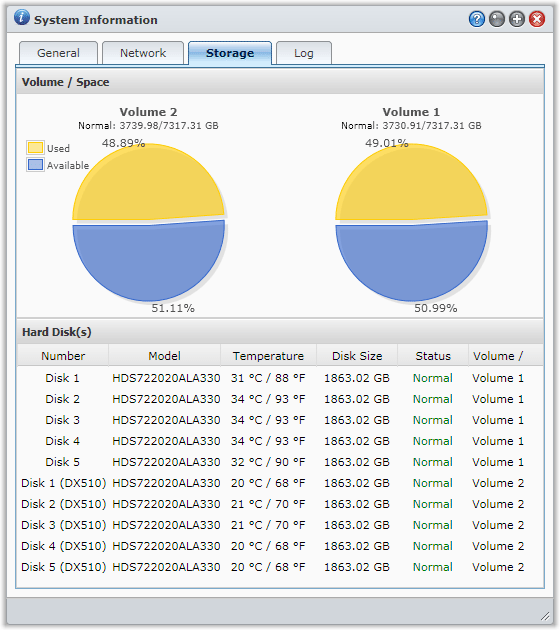
Next up I built out a 5-disk Synology Hybrid RAID (SHR) volume giving me 7.15 TB of useable space after provisioning. Since these were new drives I definitely chose the disk check as part of the build. The volume was available for use about 14 hours later with no errors found. Then it was just a matter of kicking off the copying of 6TB of files.
In terms of performance, the DS1511+ has lived up to it’s claims without issue. I was able to saturate my gigabit network and sustain it for the length of the transfer. I did try and get the link aggregation working in order to take advantage of the dual gigabit ports and higher potential network throughput. However, even though my Dell PowerConnect 2716 states it supports IEEE 802.3ad (LACP) LAG, the Synology failed to connect and then my network decided to puke on itself with all my devices going offline. Oops. I’d love to have this eventually start working as multiple sources on the Internet state that it “should” work including a few posts in a QNAP forum. However, some of those same sites were from 2005 and we all know how “standards” work out. I’m not in the market for a new gigabit switch so a single port will have to suffice for now until I can get some playtime in my network closet. Now that all of my data has been replicated and backed up, the initial benefit for having LAG implemented for moving that much data has been taken care of. While I do have dual CAT6 run to each room in our house, I’m not installing two NICs in each PC to take advantage of the additional speed. That functionality will stay with my two other servers already configured for dual NIC teaming.
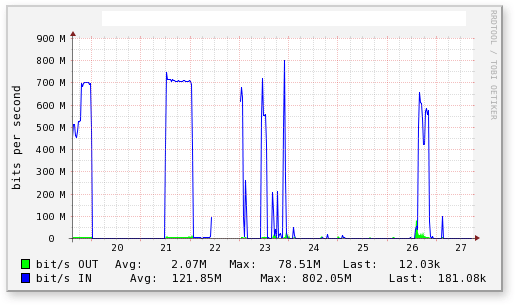
Now with a third copy of my original data sitting snug on the DS1511+, it was time to start disassembling the primary and backup servers and harvesting those drives. That meant the 4 2TB Hitachi drives from one and a 5th backup 2TB drive out of the WHS backup server were fair game. All 5 of those drives fit nicely into the DX510 and with it’s eSATA connection snugly connected to the DS1511+, all drives showed up ready for use. Volume 2 in SHR format provided an additional 7.15TB of space and was ready for use again after 14 hours or so. Technically I could have created a 10-drive SHR volume for a contiguous 14.3 TB of space, but I wasn’t ready to have all drives in a volume relying on a single parity drive just yet. (Now that DSM 3.1 is in beta, you can have an SHR volume using 2 drives for parity which might have made going with a single volume a less risky decision…)
Finishing up I moved two of my largest file shares to the DX510 which worked out pretty nicely at a 50/50 split for storage. Mind you moving 3TB even locally still took a bit of time keeping in mind those shares are actually taken offline during the move. The DSM actually makes moving shares between volumes pretty easy by simply editing the shared folder and choosing a different volume location. If I had really needed those files usable I could have created a second temporary shared folder and copied the files through the DSM file manager.
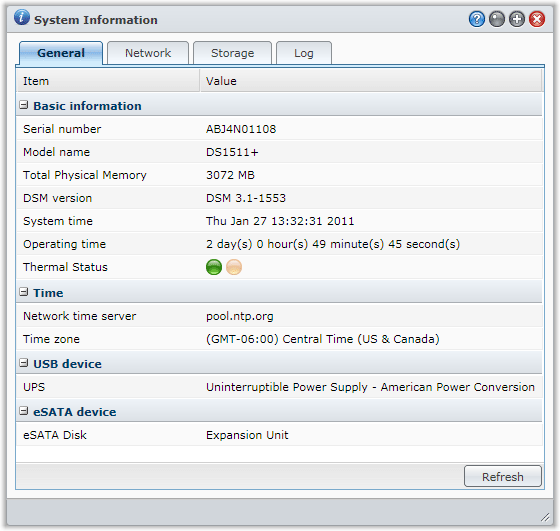
If you’ve read the specs on the DS1511+ you’ll see that it only comes with 1GB of memory. It’s labeled as non-removable but the motherboard does allow for a second stick of memory to be added. Supported memory is listed as DDR2-800 (or PC2-6400) and long and behold, I somehow had a 2GB stick of memory sitting in my used parts bin. Nice! The DS1511+ recognized it without issue. Rough initial calculations haven’t show any real change in performance but the memory should come in handy if I decide to run any of the included applications or install any of my own packages at a later time.
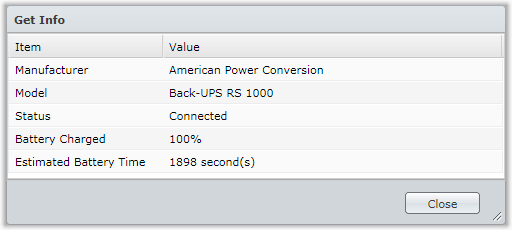
Another nice feature is that the Synology DS1511+ works with a fair number of Uninterruptible Power Supplies (UPS). I originally had two running, one for my servers (an APC Back-UPS XS 1500 LCD) and a second one just for my network and phone systems (an APC Back-UPS RS 1000). I’m now using the smaller 1000VA unit’s USB connection to feed the Synology status information and to help gracefully shut down the DS1511+ as needed.
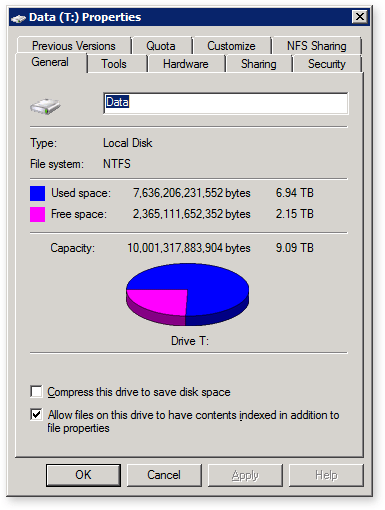
Now that all my data is tucked away, it was time to give back a little love to my backup solutions. My primary Windows 2008 R2 file server has now 5 new Western Digital WD20EARS 2TB drives in a RAID0 configuration. As expected, one of the five drives was DOA and has started the 2-week RMA process with Newegg. At essentially $70 a drive they were just too good to pass up knowing that they are performing backup duties to begin with. While the motherboard actually accepts 6 SATA drives, only 4 of them can be configured together in the Intel Matrix RAID profiles. I skipped that and just threw them together with Window’s own striped volume management. Bummer than 5 2TB drives only comes out to 9TB of provisioned space! Performance was actually pretty dismal configured either with 4 drives on the Intel Matrix or with just the Windows OS handling the RAID. Whereas before with the Hitachi drives I was getting close to 220 MB/s, these green drives were topping out at 120 MB/s even with an added 5th drive… meh. With a single drive testing at close to 90 MB/s, clearly those drives aren’t happy in a RAID 0 configuration.
With the backup server now complete and a fresh data backup sync of the DS1511+ underway, I used 4 of the remaining 9 1TB drives from the original WHS backup server to upgrade my Dell T310 2TB server to 4TB. I’ve been running this server for the last 6 months as a VMware ESX 4.1 instance so not content to simply backup my VMs and swap the drives out, I moved to VMware ESXi at the same time. A few different nuances from ESX to get used to but that new instance is now up and running with ESXi 4.1 running on a USB thumbdrive with the new 4 1TB drives in RAID0 configured as 4 virtual disks. (I don’t even want to get into the goofiness of ESXi when a 2TB volume is available during the install. Supposedly ESXi knows better than me how I want to configure that storage).
Now that you know about my VMware ESX/ESXi server, it’s probably safe to say that before I started pulling all of those backup drives out of my Windows Home Server environment, I created a new Windows Home Server V1 virtual instance on VMware. I thin-provisioned 4 100GB drives and reset all of my backup clients to use the new instance. Funny that under VMware I’m now getting close to 100 MB/s drive performance in the virtual instance whereas I topped out usually at close to 56 MB/s on bare-metal. (I’ll admit there are probably many reasons for that, drives, motherboard, RAID controllers, PCI bandwidth, etc.) WHS is now used exclusively for client backups and as an external RDP gateway.
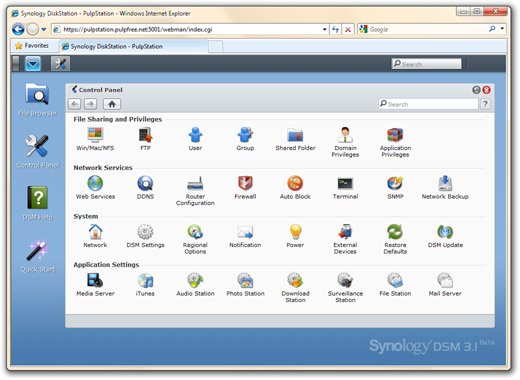
That pretty much wraps up the story of my most recent love affair with my Synology DS1511+. I did happen to catch a quick video review from CNET on my TiVo that showed the DS1511+ as an editors choice award. I concur – a Pulp Free Choice Award! There’s clearly a lot more that I could talk about – installing my own apps via bootstrap/IPKG or the other DSM functions. Perhaps I’ll save those and more for a follow-up post once the DS1511+ and I get a bit more acquainted with each other.

Synology DS1511+ quick stats:
- 165.91 MB/sec Writing, 197.8 MB/sec Reading
- Windows ADS and ACL support
- iSCSI Support as Virtualization Solution
- Scale up to 15 Drives with Synology DX510
- Expandable RAM Size (up to 3GB)
- 2 LAN with Failover and Link Aggregation Support
- Hot-swappable Hard Drive Design
Current storage systems hardware stats:
PulpStation – Synology DS1511+ w/DX510 Expansion
- 10 2TB hard drives, 2 volumes, SHR (RAID5) 14.3TB usable storage
- 3GB RAM
Trumpet – Asus Windows 2008 R2 Standard File Server
- 5 2TB hard drives, 1 volume, RAID0, 9.1TB usable storage
- Core2Duo Dual-core, 1.86GHz, 4GB RAM
Trombone – Dell PowerEdge T310 VMware ESXi 4.1
- 4 1TB hard drives, Perc 6/i RAID0, 3.64TB usable storage
- Xeon X3440 Quad-core, 2.53GHz, 24GB RAM